I am honored today to be the featured stamper over at Jingle Belles!
I have been a fan of the Jingle Belles challenge for years! I think the idea of creating a card a week to “take back Christmas” is brilliant! I thought of JB again because I was wanting to create a slimline card using this unique Santa Express Suite.
The slimline format is perfect for this Santa Express train card. I love fun-folds and I thought, why not take things up a notch.
See the instructions below for making this fun fold.
For the free PDF with detalied step by step instructions, including many close-up photos, please subscribe to my email list.
I loved this card so much, I decided to make it the star of one of my upcoming kits. You can make this card yourself – I do all the die-cutting and fun-fold cutting. You just supply the stamps, ink, adhesives, and assembly. Check it out here if you are interested – Santa Express Kit.

COLORS
Shaded Spruce
MEASUREMENTS
- See below for card base instructions. Shaded Spruce starts at 8 ½” x 8”
- Designer Series Paper at various sizes and patterns (below)
- Basic White at 6” x 3 ¾”
INSTRUCTIONS
- Kit owners: Much of the cutting and punching and die-cutting has been done for you. Simply gather your ink pads, stamps, blocks, snips and adhesives. The following cutting and scoring instructions are provided for when you want to repeat these instructions for your own use. You may need to cut the Designer Series Paper, and fussy-cut some of the images.
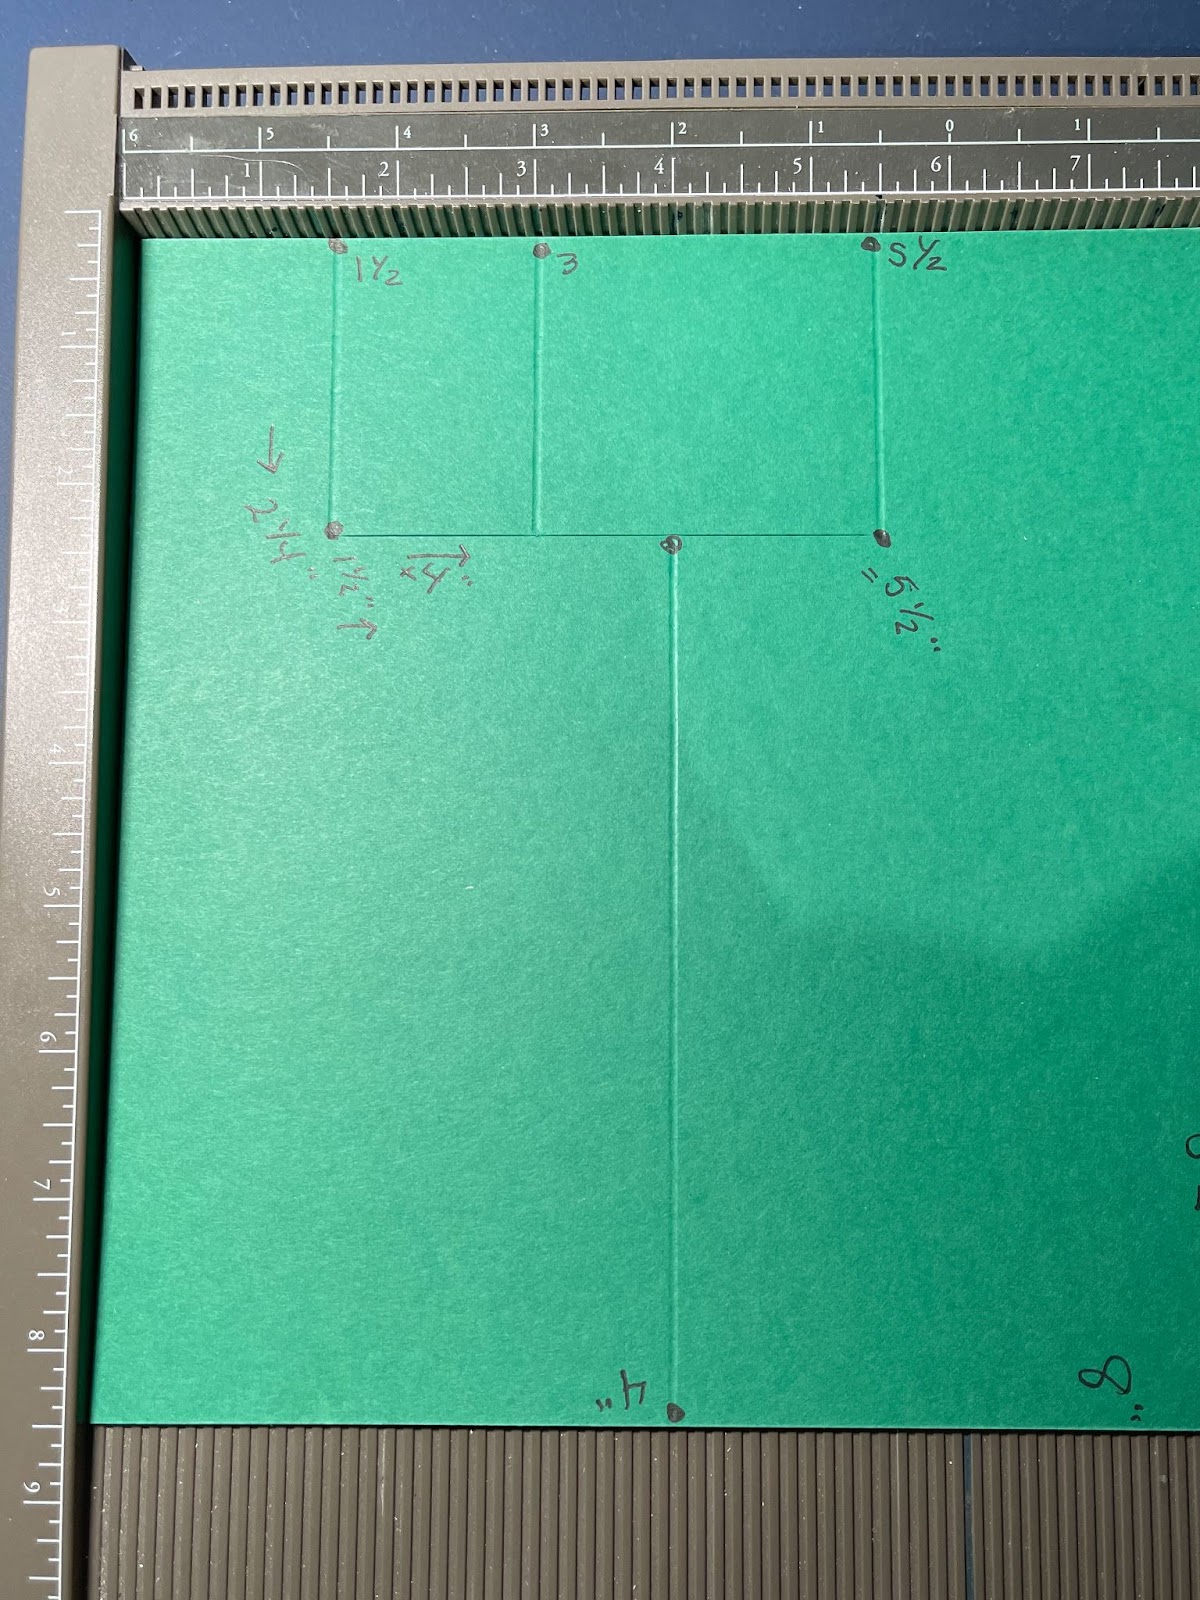
- Cut Card Base according to diagram:
- Card Base Shaded Spruce 8 ½” x 8”
- Cut a 4” line, 2 ¼” from the left edge, and 1 ½” up from the bottom edge
- Score to the left of the cut line at the 1 ½”, 3” and 5 ½” marks
- Score to the right of the cut line at the 4” mark
- Burnish the score lines well
- Cut Basic White for inside at 6” x 3 ¾”
- Cut Designer Series Paper for inside at 2” x 2 ¼”.
- Cut Designer Series Paper 8 ¼” x 1 ⅜” and adhere along bottom of card front.
- Cut Designer Series Paper 6” x 3” and adhere to main large panel.
- Cut Designer Series Paper 2” x 2” and adhere to left back.panel
- Die-cut Santa car, car with gifts, and car with reindeer from Designer Series Paper.
- Die-cut train tracks from Basic Black card stock. Adhere to bottom of card front with small amounts of liquid glue.
- Stamp smoke puffs on a Basic White scrap. Stamp penguin on a Basic White scrap. Die-cut images, and color with Blends.
- Adhere train cars with Stampin’ Dimensionals.
- Adhere trim with liquid glue, and add a teeny-tiny bow to the center car.
- Add puffs of smoke with Mini Stampin’ Dimensionals.
- Sprinkle on the gems. Add a little glitz on the puffs with Wink-of-Stella.
- Decorate the inside and envelope as desired. Fits in business-sized envelope, or slimline envelopes from SU!
SHOP-WITH-ME PRODUCTS
Kit Product LIst
- Santa Express 12″ X 12″ (30.5 X 30.5 Cm) Designer Series Paper [159582] $12.00
- Shaded Spruce 8-1/2″ X 11″ Cardstock [146981] $9.25
- Basic Black 8-1/2″ X 11″ Cardstock [121045] $9.25
- Basic White 8 1/2″ X 11″ Cardstock [159276] $10.25
- 3/16″ (4.8 Mm) Iridescent Trim [159594] $8.00
- Adhesive Backed Stars [159965] $7.50
- Tuxedo Black Memento Ink Pad [132708] $6.00
- Santa’s Delivery Bundle (English) [159590] $48.50
- Balmy Blue Stampin’ Blends Combo Pack [154830] $9.00
- Gray Granite Stampin’ Blends Combo Pack [154886] $9.00
- Pumpkin Pie Stampin’ Blends Combo Pack [154897] $9.00
- Wink of Stella
- Slimline envelope (or Business-Sized envelope)
Basics Supply List
- Paper Snips [103579] $10.00
- Simply Scored [122334] $30.00
- Bone Folder [102300] $7.00
- Paper Trimmer [152392] $25.00
- Mini Glue Dots [103683] $5.25
- Multipurpose Liquid Glue [110755] $4.00
- Stampin’ Dimensionals [104430] $4.00
- Mini Stampin’ Dimensionals [144108] $4.00
- Foam Adhesive Sheets [152815] $8.00
- Stampin’ Cut & Emboss Machine [149653] $120.0
Subscribe here to get on my email list, PLUS get a free PDF with even more detailed instructions and photos – lelameinke.com/subscribe
Purchase the kit here so you can make it yourself – https://lelameinke.com/product/santa-express-serenity-kit/
Shop my other kits and PDFs – lelameinke.com/stamping